
Click the links below for more information on setting up specific payment methods:
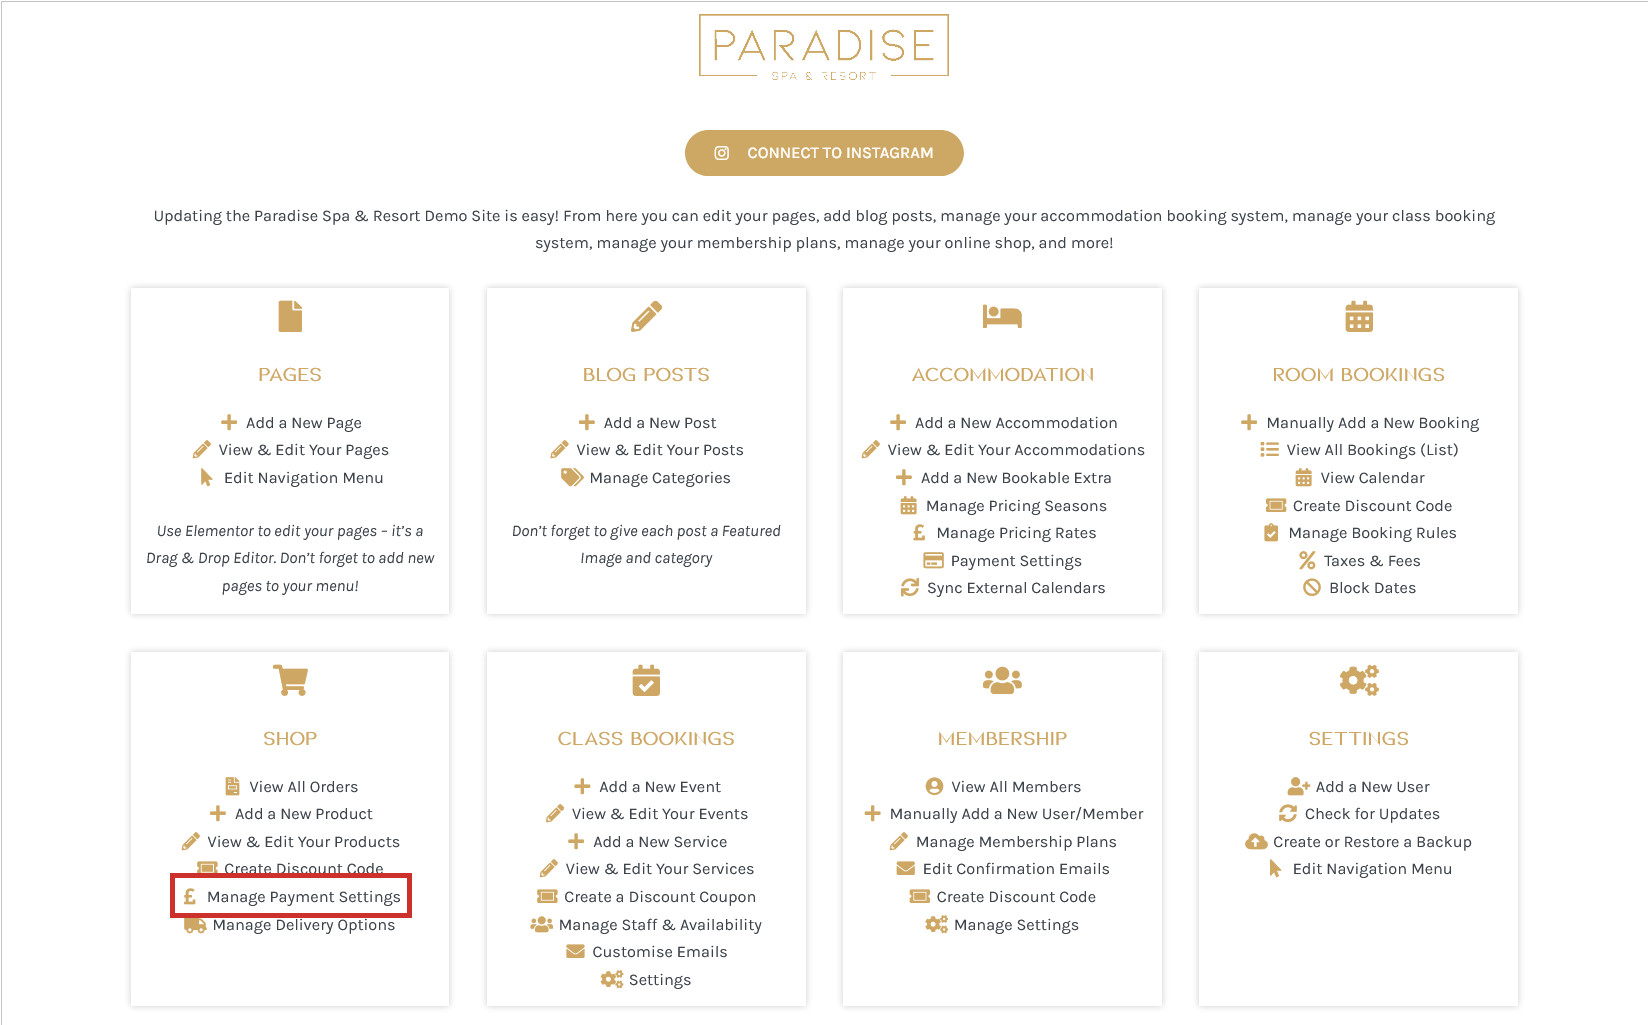
You can enable many different payment options including BACS, cheque payments, cash on delivery, PayPal and Stripe. Click Manage Payment Settings in your dashboard under the ‘Shop’ heading to edit your payment options:
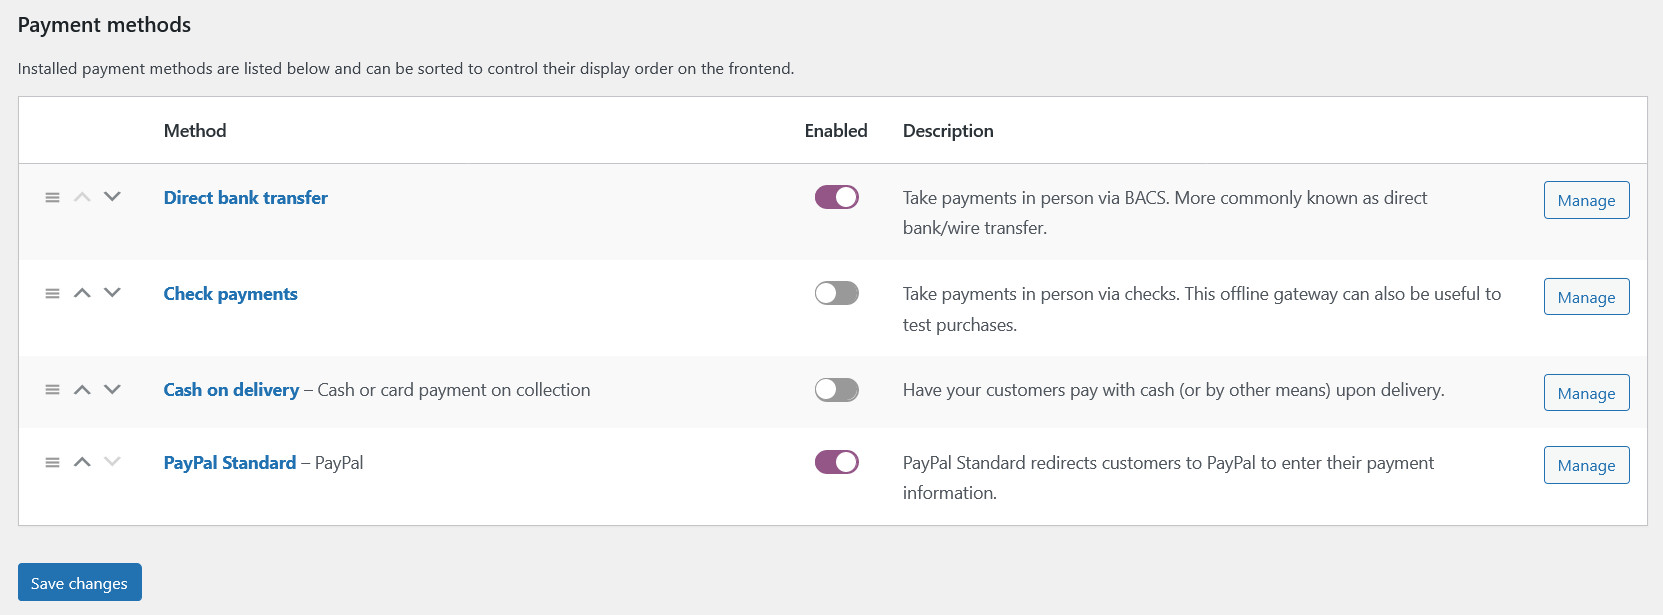
This will show a list of all possible payment methods. Use the toggle to enable a payment method, and click ‘Manage’ or ‘Set Up’ next to a payment method to edit the settings for it:
Direct bank transfer
To enable direct payments via bank transfer, you need to enable the Direct bank transfer payment method, and manage the settings for it to add your account details:
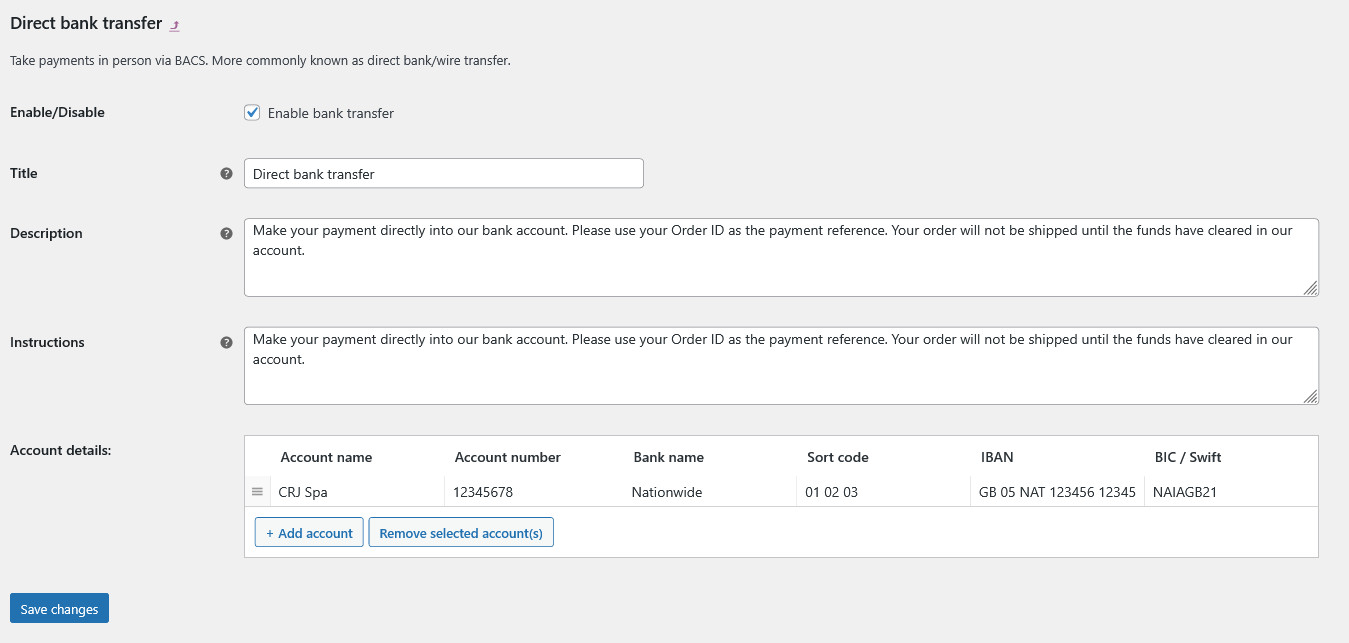
- Enable/Disable: Enable or disable this payment method for your store
- Title: The name of the bank transfer payment method (visible to customer during checkout)
- Description: A description of the bank transfer payment method, visible to customers during the checkout
- Instructions: Instructions for completing the payment which are included in order confirmations
- Account details: Your bank account details, shown to the customer once they have placed the order
Please Note
Orders placed using the bank transfer payment method will have the order status 'on hold'. You should update the order status to 'processing' once you have received payment, and 'completed' once you have shipped the order. Find out more about order statuses.
Cheque payments
To enable direct payments via cheque, you need to enable the Check payments method, and manage the settings for it to add instructions:
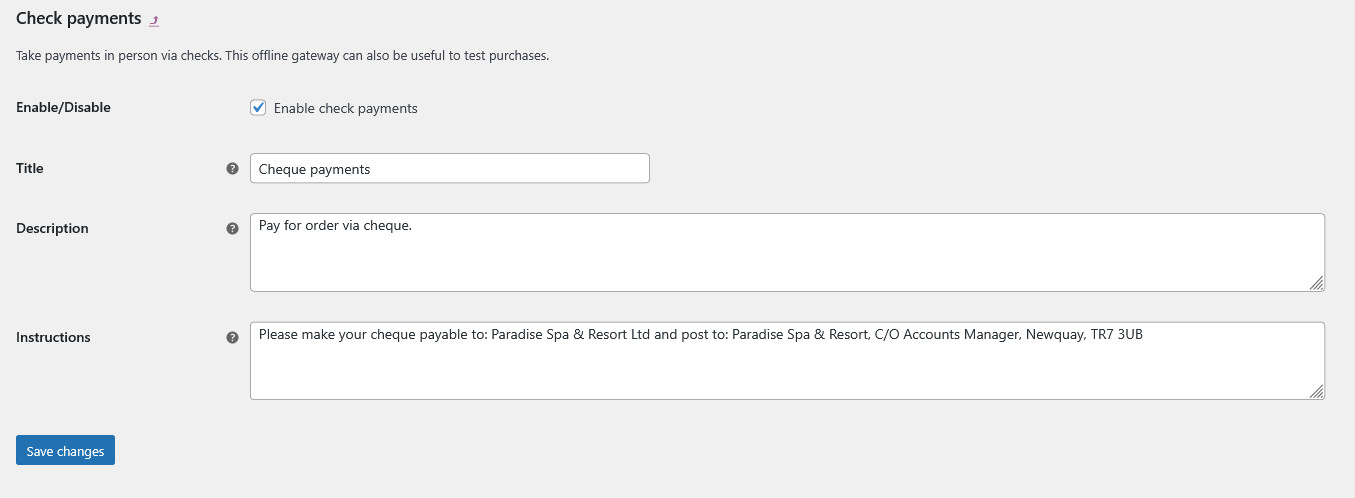
- Enable/Disable: Enable or disable this payment method for your store
- Title: The name of the cheque payment method (visible to customer during checkout)
- Description: A description of the cheque payment method, visible to customers during the checkout
- Instructions: Instructions for completing the payment which are included in order confirmations – make sure you include where to send the cheque and who to make it out to
Please Note
Orders placed using the cheque payment method will have the order status 'on hold'. You should update the order status to 'processing' once you have received payment, and 'completed' once you have shipped the order. Find out more about order statuses.
Cash on delivery
If you are willing to accept cash when the order is delivered or collected, you need to enable the Cash on delivery payment method and manage the settings:
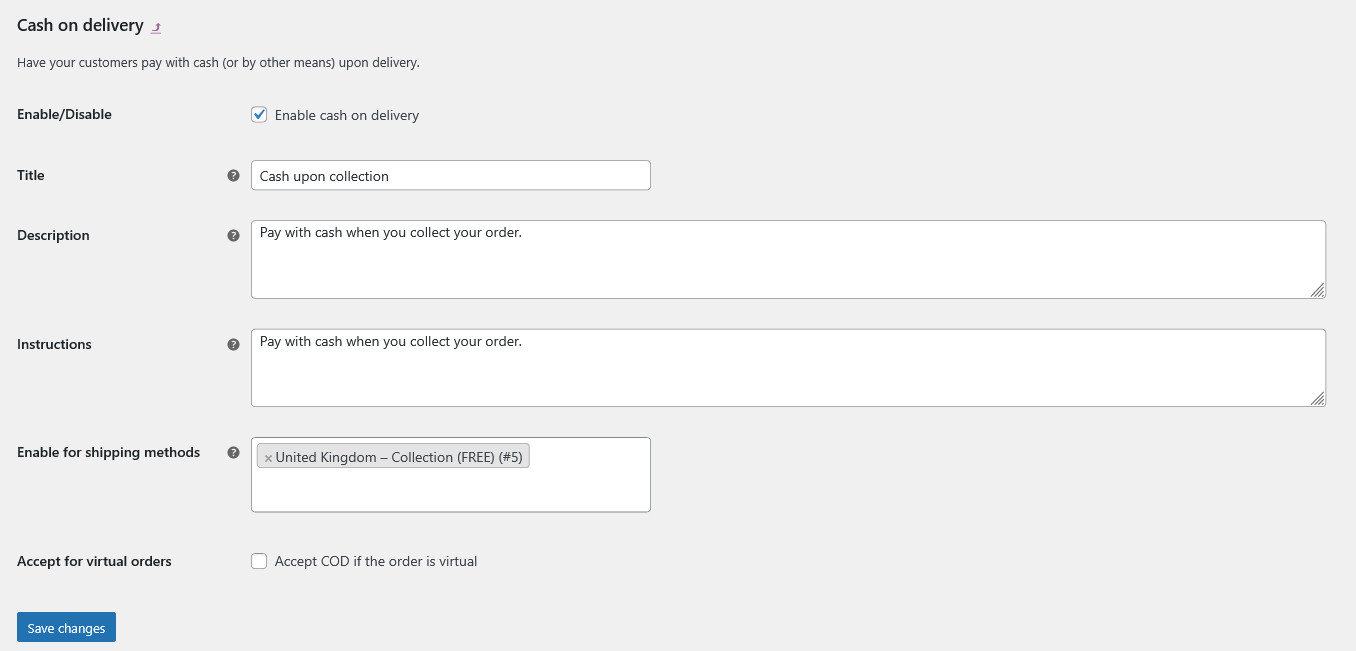
- Enable/Disable: Enable or disable this payment method for your store
- Title: The name of the cash payment method (visible to customer during checkout)
- Description: A description of the cash payment method, visible to customers during the checkout
- Instructions: Instructions for completing the payment which are included in order confirmations
- Enable for shipping methods: Choose which shipping methods can use the cash on delivery option (accepting cash only works if customers are collecting their order, or if it is being delivered in-person)
- Accept for virtual orders: Decide if virtual or downloadable orders can use cash on delivery (usually this should be disabled, as you can’t accept cash from someone if they’re not coming to collect a physical item)
Please Note
Orders placed using the cash payment method will have the order status 'on hold'. Once the order has been delivered or collected, and the cash has been received, you should update the status to 'Completed'. Find out more about order statuses.
PayPal Standard
PayPal Standard directs customers to PayPal to finish checking out. You must have a PayPal account to use PayPal Standard. To accept payment via PayPal, enable the PayPal Standard payment method and update the settings:
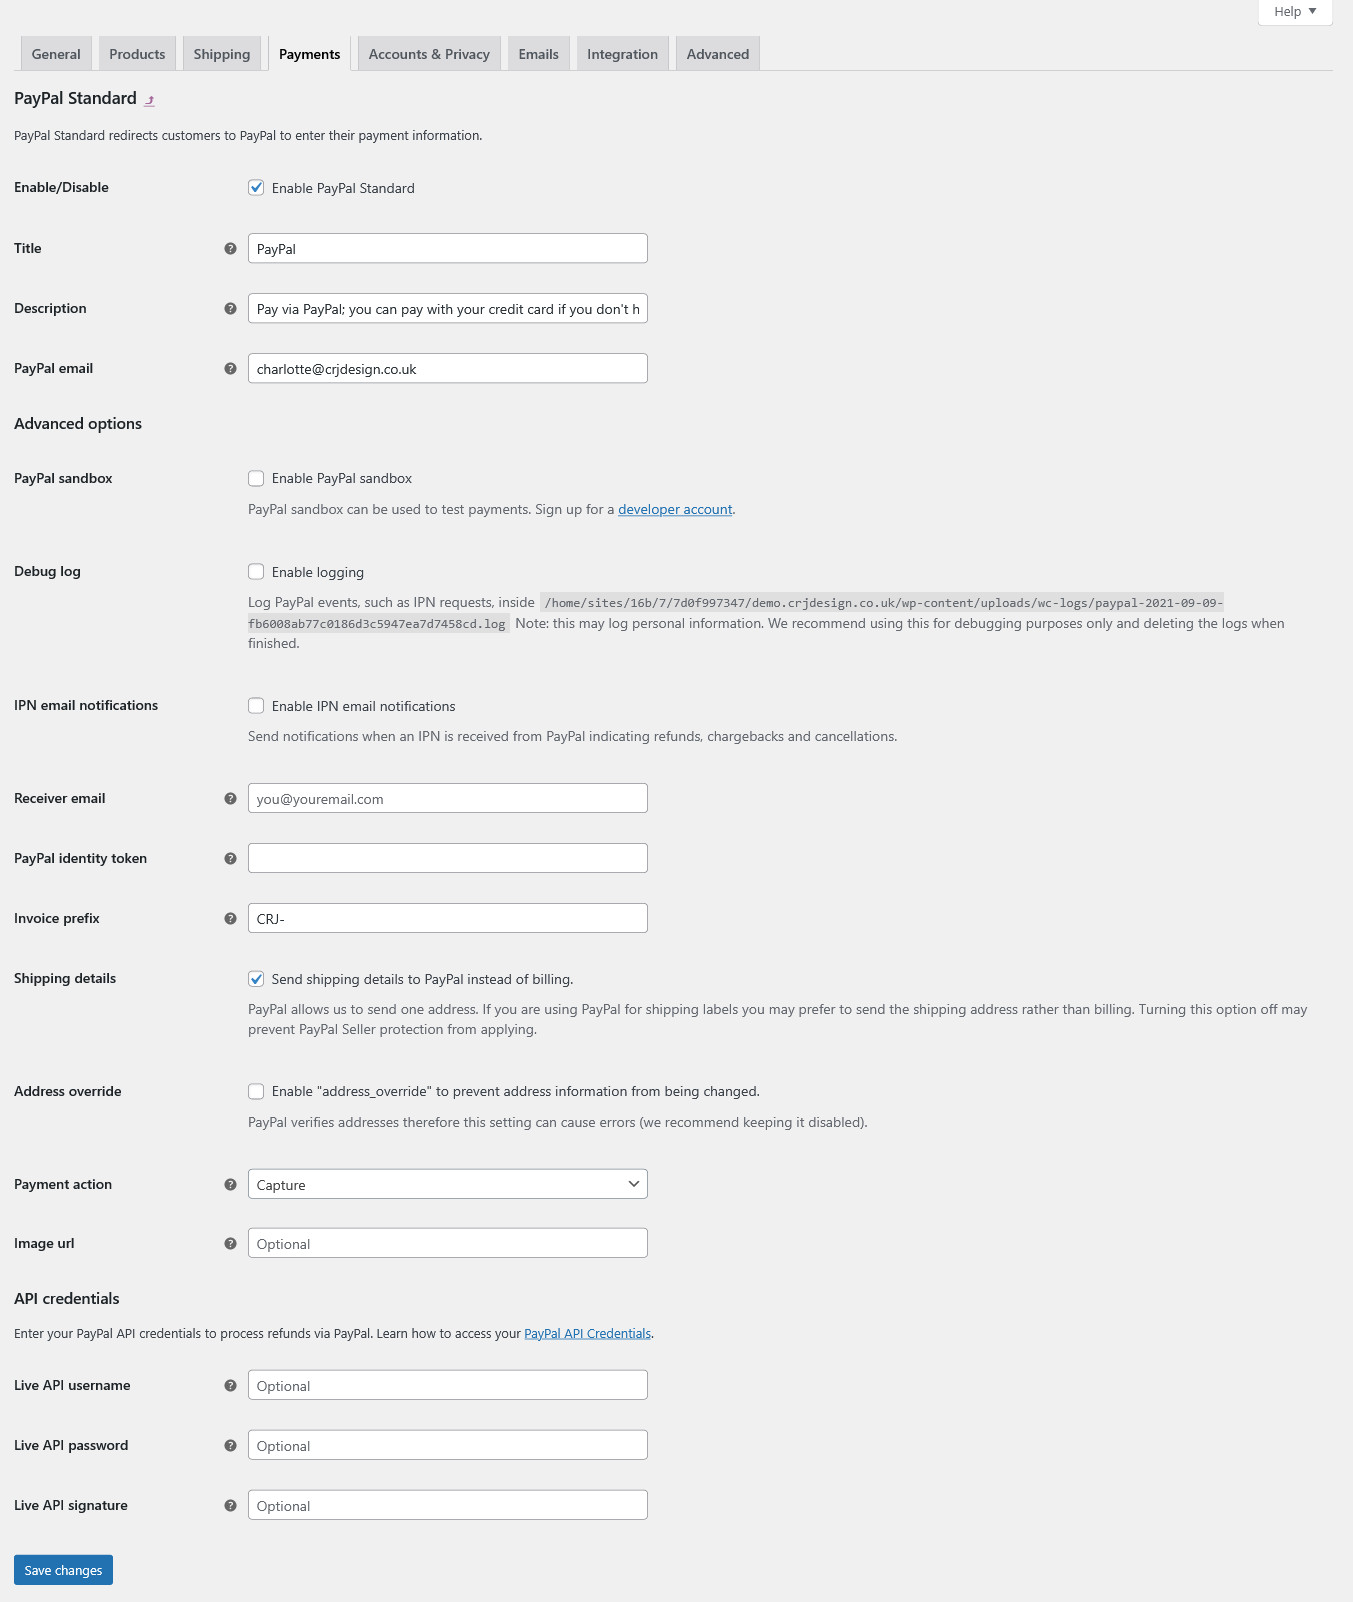
- Enable/disable: Enable or disable PayPal for your store
- Title: The name of the PayPal payment method (visible to customers during checkout)
- Description: A description of the PayPal payment method, visible to customers during checkout
- PayPal email: Your PayPal email address (this must match the email used for your PayPal account)
Advanced options
- PayPal Sandbox: Enable this to test payments
- Debug log: Enable logging to identify any potential issues with PayPal
- IPN email notifications: Check this box to enable Instant Payment Notifications (IPN), which are sent from PayPal when you receive a payment, issue a refund, or a chargeback or cancellation
- Receiver email: Your PayPal email address to receive IPN notifications
- PayPal identity token: Only required if you signed up for the Data Transfer option on your PayPal account; can be used to verify payments if you have IPN issues
- Invoice prefix: Useful if you have multiple stores; WC is default to denote WooCommerce transactions
- Send shipping details to PayPal: You can opt to have WooCommerce send shipping details to PayPal to create shipping labels instead of billing
- Address override option: PayPal verifies addresses therefore this setting can cause errors; we recommend keeping it disabled, but it can be useful in preventing address information from being changed
- Payment action: ‘Capture’ payment immediately or only ‘Authorise’ the payment so it won’t be taken until the order is marked as Complete (note you must enter API details to authorise payments)
- Image URL: Gives the option to specify a 150×50 px image to display on PayPal checkout pages
- API Credentials: Optional API credentials to process refunds via PayPal (can be set up from your PayPal account)
Stripe
Stripe is one of the best payment processors available with really low fees. To accept payment via Stripe, enable the Stripe payment method (you may need to download and install the Stripe Woocommerce plugin) and manage the settings to connect your Stripe account. You must have a Stripe account set up and approved to accept payments:

- Enable/Disable: Enable or disable Stripe for your store
- Title: The name of the Stripe payment method (visible to customers in checkout)
- Description: A description of the Stripe payment method, visible to customers in the checkout
- Stripe Account Keys: Click the ‘Set up or link an existing Stripe account’ button to connect with your Stripe account (button will only be visible after you Save changes), or manually enter your API keys below (instructions here)
- Webhook Endpoints: You must add the webhook endpoint to your Stripe account (instructions here)
- Webhook secret: Optional webhook signing secret from your Stripe account
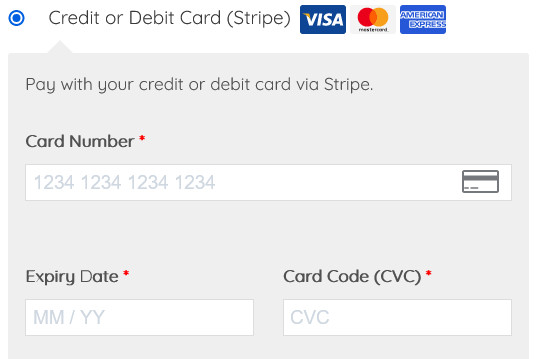
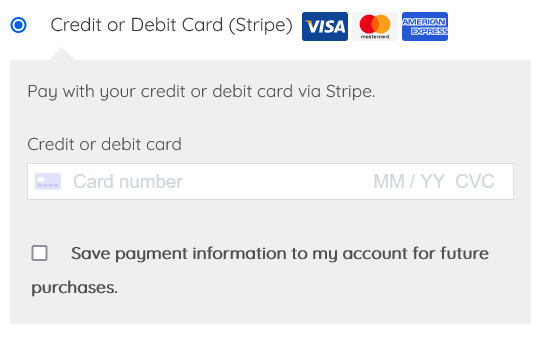
- Inline Credit Card Form: Displays the credit card form in a single line, rather than having seperate fields for the expiry date and CVC:
Regular Credit Card Form:
Inline Credit Card Form:
- Statement Descriptor: This will appear on your customer’s bank statement, so it should be your business name
- Capture: Capture the payment immediately, or uncheck this box to capture charge later (must be captured within 7 days)
- Payment Request Buttons: Choose whether to enable payment request buttons (Apple Pay & Google Pay) for quick payments
- Payment Request Button Type: Apple & Google Pay buttons can be ‘Buy’, ‘Donate’, Branded, or Custom
- Payment Request Button Theme: Dark, Light, or Light Outline (choose whichever will contrast your background, usually Dark)
- Payment Request Button Height: Enter a height (in pixels) for the Apple & Google Pay buttons
- Saved Cards: Enable customers to save their card details for future purchases – card details are stored on Stripe servers and not on your website for security
- Logging: Choose to enable logging, which can help identify any issues